In May of 2012, Second Life introduced a feature called Local Textures that allows you to pull from a local image file to reflect a texture in world. In April of 2018, I learned that this was a thing.
What’s so great about this? A few things:
- It allows you to view a texture in world without an upload fee.
- As you change the texture in a graphics program, when you save the new version, it’s reflected in SL.
This is amazing for developing a texture from scratch, such as when I’m painting a coat for the Water Horse Riding Horse. You can see the changes you make in real time (as you save it) reflected on the object in world. And… you’re not paying anything to do it until you finalized the texture and upload it.
I learned this also works with your profile picture! Ever get a squished up profile pic? No more! Just choose a local file and resize it on your computer until it fits your profile perfectly! 🙂
How To
To texture something from a local file:
- In SL, Edit the object.
- Select the object or object face you want to texture.
- Click the Texture tab.
- Click the Texture box.
- Select Local.
- Click Add and choose the texture from your computer.
- Select the texture in the right box.
- Make sure Apply Now is checked.
- Click Ok.
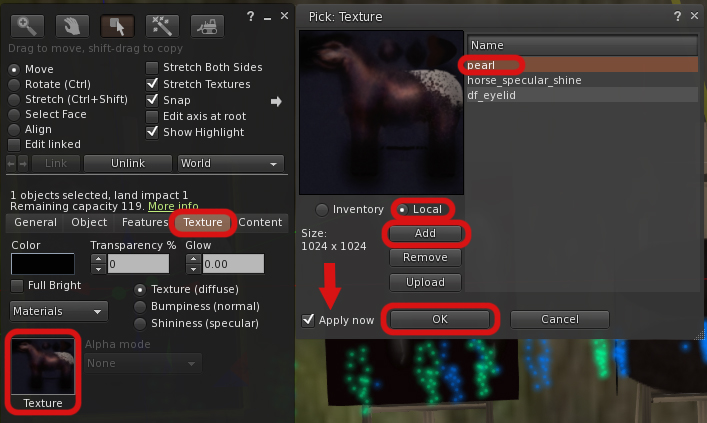
Now your object will use the texture from your computer.
Note: Only you can see the texture while it’s local. So don’t ask friends, “How does this look?” To everyone else, it’ll be an untextured object. 🙂
Getting the Local Texture UUID
In the case of creating and testing a Water Horse applier, I need to obtain the local texture’s UUID for the applier script. Other scripts may also ask for this identification number. Unlike a texture in world, which you can just right-click to get the UUID, there’s not a quick way to see this.
However, local textures do have an assigned UUID, which you can see by putting a script into a prim that has your texture applied to it.

Above, is a coat in progress with my textures applied to “easels”. These are just normal cubes I rezzed and reshaped.
All you really need is a rezzed cube for this, but you can get as fancy as you’d like.
How to:
- Rez a cube.
- Texture it with your local texture. The import thing is to make sure the top face is textured, but if you just texture the whole thing, that works, too.
- Edit the cube and click the Content tab.
- Click New Script.
- Double click that script to open it.
- Add this script inside and save it.
default
{
    state_entry()
    {
        llSay(0, "Ready to go!");
    }

    touch_start(integer total_number)
    {
       llSay(0, llGetTexture(0));
   }
}
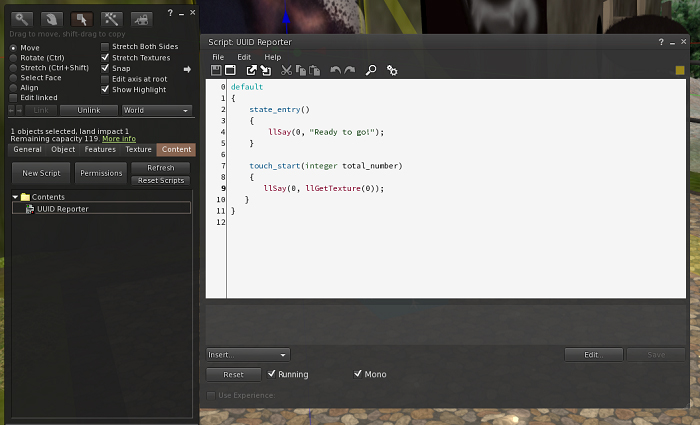
Now, when you click the cube, it will tell you the UUID number of the local texture. You can copy and paste that to use as you need.
I’ve noticed that when I work on a project for a while, sometimes the UUID number will change. This doesn’t happen all the time, but if you start making changes to your texture that don’t show up, or the texture suddenly turns gray on your screen, it’s likely that you just need to click and recopy the new UUID number.
Now go out there and texture some things! 🙂
Categories
*|* {May} *|* {2018} *|* {Second Life} *|*