It’s not very often that I get excited about a system update for Nintendo Switch. Not that I don’t appreciate all the hard work that goes into updating my hardware, mind you, but rarely is there something that effects me as much as this one simple update.
As a blogger, transferring screenshots to my PC is a major deal. Up until now, the process for doing that on the Switch was a bit cumbersome (but thankfully easier than Wii U or 3DS).
I had to:
- Undock the Switch (I play it docked about 99% of the time)
- Turn it completely off
- Pull the SD card of out it
- Put the SD card into fiddly card reader that I usually had to fight with to figure out the proper direction of insertion every time
- Put that in a USB slot on my PC
- Hope the USB reader didn’t give me a fit – if not, find it in My Computer and open it to see screenshots
- Transfer the entire folder of screens for the last couple months because I had no idea what I already have on my PC vs what I’ve taken since the last time I did this process
Now, it’s as simple as undocking, connecting to USB and tapping a few settings in the Switch menu. Here’s how.
1- You have to have the right type of USB cable.
Just a heads up, not just any USB cable will do. Basically, you’ll need a USB-C cable. The official patch notes says:
A USB charging cable [model HAC-010] or a USB-IF certified USB cable that supports data transfer is required to connect to a computer.
Patch notes
I had to go rooting around to find one that would work. In the end, I discovered the USB cable that came with my SNES Switch controller did the trick.
Once you have the cable, just connect it to the USB-C port on the bottom of the Switch, and the USB portion to a slot on your PC.
2 – Initiating Transfer
Once you’ve made the cable connection, then it’s time to start the transfer. From the Home screen of your Switch you:
- Tap Settings, then tap Data Management.
- Tap Manage Screenshots and Videos, then Copy to a Computer via USB Connection.
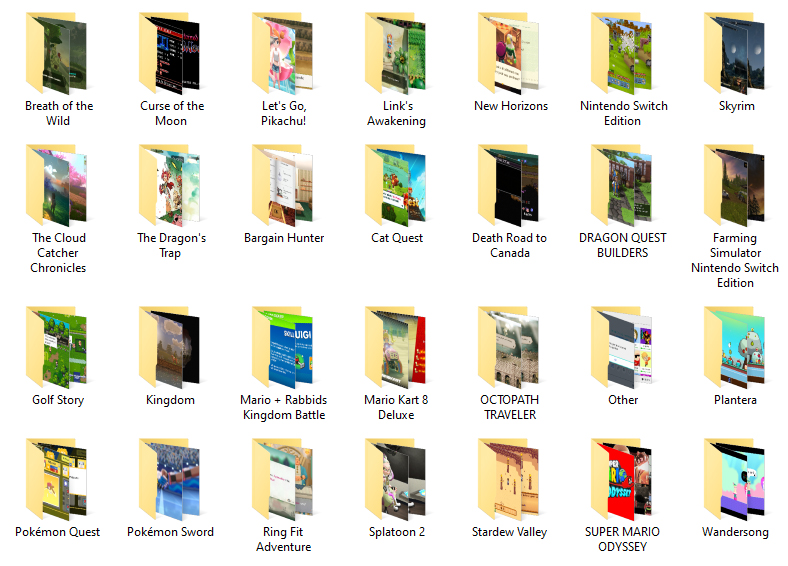
And just like that, you’ll get a prompt on your PC to manage a new storage device. Once you open the folder, you’ll see something like this:

That’s right, the Switch so nicely breaks down your content by title for you, making it much easier to transfer just the screens for just the game you want!
Previously, when transferring from the SD card, the system simply organized files by date, so there was no knowing which game you were downloading screenshots for. I just ended up dumping months worth of screenshots on my PC rather than messing around with it. But then I’d have to fish through those folders to find the screenshots I really wanted.
This is so much nicer!
Just copy the shots you want from the game folders and you’re ready to share, blog or whatever you want to do with your screenshots.
Thanks for the great QoL update, Nintendo!
